Distal Locking
Distal Locking Combination Options
Click on image for enlarged view
 Several distal locking technique options are available to the surgeon.
The Radiolucent Drive provides a convenient technique for targeting
and drilling the distal locking holes. The Radiolucent Drive reduces
the working distance from the incision, offers less restricted
positioning when using the image intensifier, and reduces operative
time.
Several distal locking technique options are available to the surgeon.
The Radiolucent Drive provides a convenient technique for targeting
and drilling the distal locking holes. The Radiolucent Drive reduces
the working distance from the incision, offers less restricted
positioning when using the image intensifier, and reduces operative
time.
Alternatively, the locking technique with the Distal Aiming Device
requires a minimum working distance of 47 cm between the receiver
and the patient's leg; see page 37. If less working distance is available,
see the alternative drilling technique in the Drilling in Two Steps section of this guide.
As a farther option, the 4.0 mm/4.5 mm Drill Bit [355.90]
may be used to drill for distal locking in the standard freehand fashion.
The distal holes are locked first to maintain limb length and control
rotation of the distal fragment.
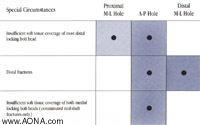
The Universal Tibial Nail has three distal locking holes. Two holes are
oriented mediolaterally (M-L), and one hole is oriented
anteroposteriorly (A-P). Usually, locking is accomplished with two
bolts, inserted medial to lateral. The chart below offers other locking
options for special circumstances.
Next Page
UNS Index